# Lifecycle Hooks
As many other JavaScript frontend frameworks, Vue runs through a lifecycle flow where we can identify special or key moments.
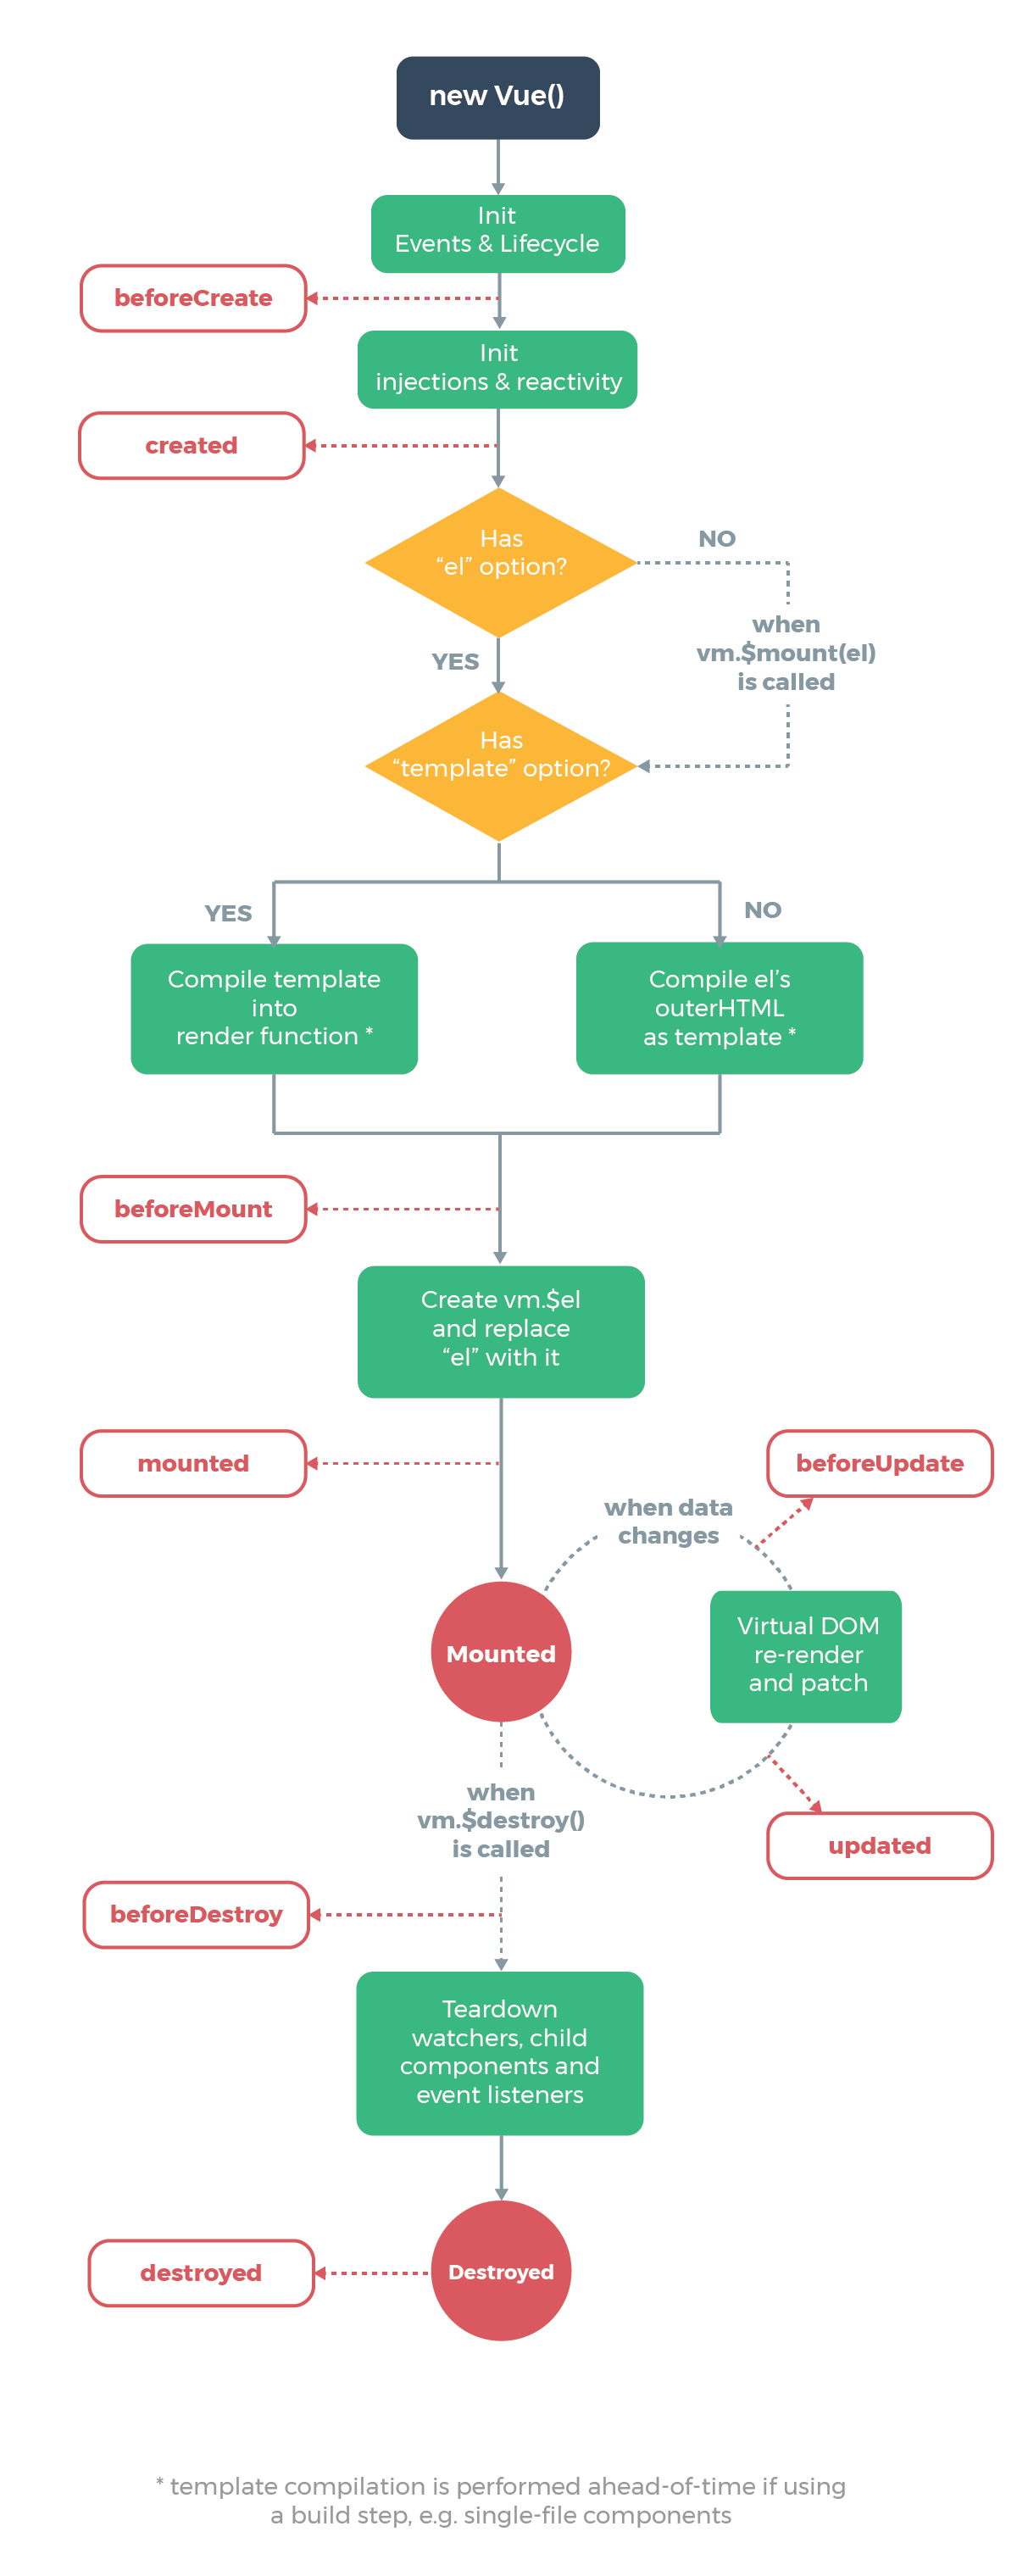
These moments into the lifecycle flow are direclty tied to a very special set of methods, and those methods are known as lifecycle hooks.
Lifecycle hooks allow us to leverage our application's behavior by performing actions such as fetching data, communicating events and so on.
Let's take a look at some useful concepts when it comes to lifecycle.
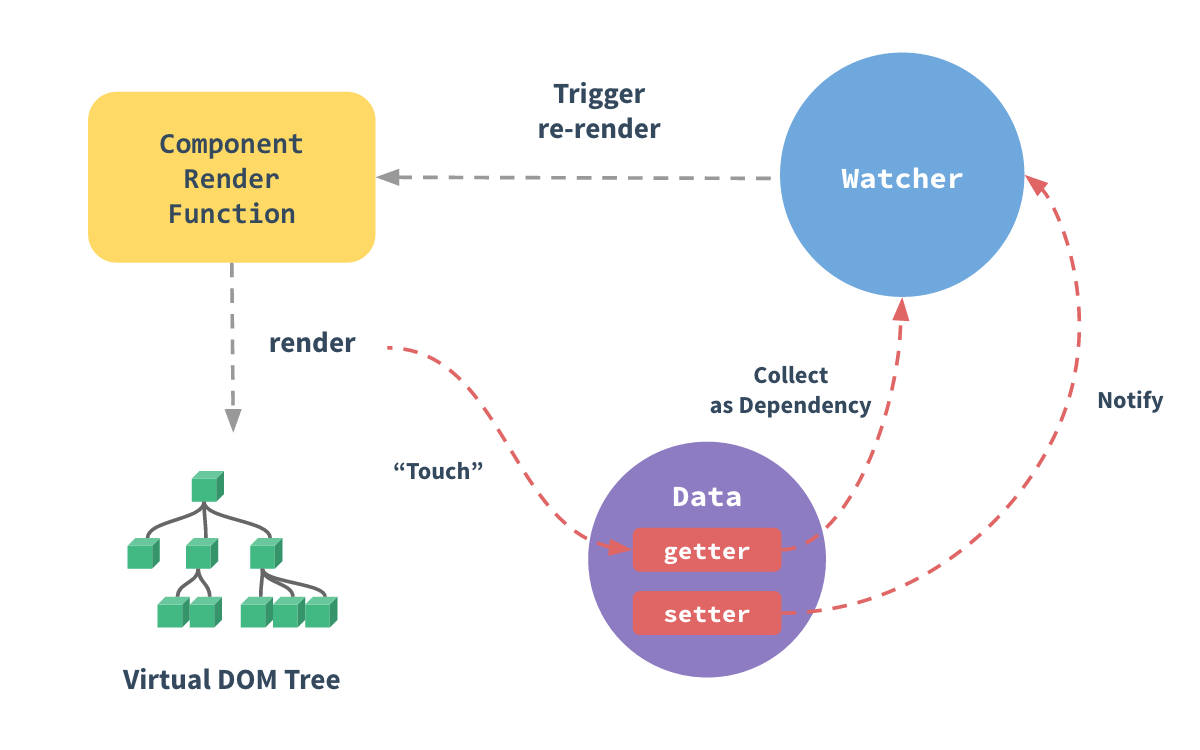
# Reactivity
Reactivity is probably one of the most important features when working with Vue.js and even with modern Javascript frontend frameworks. To put it on simple words, reactivity is a feature that will allow us to keep track of changes in our components/properties into our Vue instance. Eventually, Vue will internally manage and keep track of change notifications and/or dependency changes.
In order to enable this reactivity feature, Vue takes advantage of the Object.defineProperty method introduced in ES5, using it to convert every property into a getter/setter.
Below, is a very ilustrative diagram on how Vue handles reactivity:
# Data rendering
On the early steps of this bootcamp, we learnt that the template is the suggested place to render our data (or the .html file when it comes to splitted components). However, there are specific cases where we want to use a more in depth approach using the render function. Let's take a look at this practical use case coming from the official documentation:
<template>
  <h1 v-if="level === 1">
    <slot></slot>
  </h1>
  <h2 v-else-if="level === 2">
    <slot></slot>
  </h2>
  <h3 v-else-if="level === 3">
    <slot></slot>
  </h3>
  <h4 v-else-if="level === 4">
    <slot></slot>
  </h4>
  <h5 v-else-if="level === 5">
    <slot></slot>
  </h5>
  <h6 v-else-if="level === 6">
    <slot></slot>
  </h6>
</template>
export default {
  props: {
    level: {
      type: Number,
      required: true
    }
  }
};
The first impression about this template is the imperative and verbose code, that makes it harder to mantain. Just think about the fact you want to add another subelement or behavior to each type of header, you'll find yourself repeating code through all of the possible if cases. On situations like this is where the render functions comes into place to create the difference and use a different approach, let's refactor this component using it.
export default {
  render: createElement => {
    return createElement(
      "h" + this.level, // tag name
      this.$slots.default // array of children
    );
  },
  props: {
    level: {
      type: Number,
      required: true
    }
  }
};
The component now looks much more simpler and easy to mantain, but we have a lot of new approaches here, let's breakdown the ideas:
- The
renderfunction returning just one element, which is important due to component's definition. In order to do that, thecreateElementfunction is a key step. This function will be always received as a parameter. - The
this.$slots.defaultis an important property in the Vue instance, basically stores a default slot tag. - Within the render function, we can still use the
thiscontext variable to access properties.
# Directives and Data Binding
These two concepts are essential when it comes to Vue.js. Let's first take a look at directives and then the way it's related to data binding:
# Directives
Similar to Angular.js/Angular, directives are special symbols we can find on HTML elements. These symbols or tokens tell Vue.js to do something special with the DOM element, for instance, set the innnerText, respond to an event and so on.
In Vue.js, the convention is to use v-as the prefix for every directive. Let's take a look to a very simple example:
<template>
  <div v-text="greeting"></div>
</template>
export default {
  data: function() {
    return {
      greeting: "Hello Gorilla Logic!"
    };
  },
}
In the example above, we're telling Vue to render the text of the div element using a directive v-text which is tied to the data property greeting.
<template>
  <div v-on:click="clickHandler"></div>
</template>
export default {
  methods: {
    clickHandler(){
      console.log('Clicked using a directive');
    },
  },
}
In the example above, we're telling Vue to execute a method called clickHandler when user clicks the div. The syntax v-on:click help us to achieve this.
# Data Binding
As you might have noticed, directives are useful to achieve multiple things such as configure event handlers, determine element behavior and bind data. Data binding is a very specific and useful way to render data in components, even more because it takes advantage of Vue.js reactivity implementation to react to data changes.
In the first example of data binding, we can expect the innerText of the div DOM element to refresh every time the greetingproperty changes.
# Event handling
As previously mentioned during the directives explanation, there are special directives in Vue.js that allow us to listen events in DOM elements and eventually execute actions using the power of JavaScript. Javascript code that reacts to the event can be expressed in multiple ways, for example using inline expressions like v-on:clicl="counter += 1" or even component methdos like this v-on:click="methodA", where methodA is a defined component's method.
# Event propagation management
When working with events, it's important to have control over event behaviors. For instance, when we need to stop the default propagation of a submit event, it's pretty common to proceed with a e.preventDefault() expression as the first line of our event handler. Although this approach is fine, we can also take advantage of the Event Modifiers. This are nothing but suffixes we place right after the event directives, that allow us to control the propagation of the event itself (without even placing additional logic into our event modifier), for instance:
<form @submit.prevent="formHandler"></form>
The example above, will prevent the default propagation of the submit event, in this way we can keep our formHandlermethod focused on its logic. The available modifiers offered by Vue.js are:
stoppreventcaptureselfoncepassive
# Hooks Definitions
Now, let's take a look the main hooks provided by Vue.
TIP
Take into consideration that some of these methods doesn’t get called when doing server-side rendering
# beforeCreate
This hook is called synchronously immediately after the instance has been initialized. At this point data has not been made reactive, and events have not been set up yet.
export default {
  beforeCreate() {
    console.log("Nothing gets called before me!");
  }
};
# created
This hook is called synchronously after the instance is created. At this point you will be able to access reactive data and events are active. Templates and Virtual DOM have not yet been mounted or rendered. The $elis not available yet because the mount phase has not been completed yet.
export default {
  data() {
    return {
      property: "Blank"
    };
  },

  computed: {
    propertyComputed() {
      console.log("I change when this.property changes.");
      return this.property;
    }
  },

  created() {
    this.property = "Example property update.";
    console.log(
      "propertyComputed will update, as this.property is now reactive."
    );
  }
};
# beforeMount
The beforeMount hook runs right before the initial render happens and after the template or render functions have been compiled.
export default {
  beforeMount() {
    console.log(`this.$el doesn't exist yet, but it will soon!`);
  }
};
# mounted
This hook is called after the instance has been mounted. At this point you will have full access to the reactive component, templates, and rendered DOM (via this.$el). The most frequently used patterns are fetching data for your component (use created for this instead,) and modifying the DOM, often to integrate non-Vue libraries.
<template>
  <p>I'm text inside the component.</p>
</template>
export default {
  mounted() {
    console.log(this.$el.textContent); // I'm text inside the component.
  }
};
# beforeUpdate
This hook is called when data changes, before the DOM is patched. It allows you to get the new state of any reactive data on your component before it actually gets rendered.
export default {
  data() {
    return {
      counter: 0
    };
  },

  beforeUpdate() {
    console.log(this.counter); // Logs the counter value every second, before the DOM updates.
  },

  created() {
    setInterval(() => {
      this.counter++;
    }, 1000);
  }
};
# updated
This hook is called after a data change causes the virtual DOM to be re-rendered and patched. If you need to access the DOM after a property change, here is probably the safest place to do it.
<template>
  <p ref="dom-element">{{counter}}</p>
</template>
export default {
  data() {
    return {
      counter: 0
    };
  },

  updated() {
    // Fired every second, should always be true
    console.log(+this.$refs["dom-element"].textContent === this.counter);
  },

  created() {
    setInterval(() => {
      this.counter++;
    }, 1000);
  }
};
# activated
This hook is called when a kept-alive component is activated.
# deactivated
This hook is called when a kept-alive component is deactivated.
# beforeDestroy
This hook is called right before a Vue instance is destroyed. At this stage the instance is still fully functional. If you need to cleanup events or reactive subscriptions, beforeDestroy would probably be the time to do it.
export default {
  data() {
    return {
      someLeakyProperty: "I leak memory if not cleaned up!"
    };
  },

  beforeDestroy() {
    // Perform the teardown procedure for someLeakyProperty.
    // (In this case, effectively nothing)
    this.someLeakyProperty = null;
    delete this.someLeakyProperty;
  }
};
# destroyed
This hook is called after a Vue instance has been destroyed. When this hook is called, all directives of the Vue instance have been unbound, all event listeners have been removed, and all child Vue instances have also been destroyed.
import MyCreepyAnalyticsService from "./somewhere-bad";

export default {
  destroyed() {
    console.log(this); // There's practically nothing here!
    MyCreepyAnalyticsService.informService(
      "Component destroyed. All assets move in on target on my mark."
    );
  }
};
# Additional Links
- Lifecycle Hooks Learn about lifecycle hooks in depth.
- Reactivity in Depth Deep dive into reactivity management.
- Vue.js Instance Properties Know more about the available properties in the Vue insnce.
- Directives Directives in depth
- Data Binding Data Bindnig in depth
- Event Handling Event Handling with Vue.js
# Project Tasks
Now that we know more advanced concepts about components that we can apply to leverage more complex logic in our app. That being said, let's create:
- Base reusable components to start preparing our main logic. This includes the components below:
- Search input component.
- Search global (lightbox) component.
- Favorite button component.
- Track list component.
- Also, take into consideration this sub-steps to integrate the functionality in our current skeleton (decide wisely the best place to integrate the right pieces):
- Integrate search lightbox component in App Bar component.
- Integrate track list component in home view.
# Resolution
The componentes we covered on this tasks section are really important to understand how can we implement reusability within Vue.js. Let's take a look to eah of the components and start to integrate them refactoring our code: