# Introduction
When our application starts to grow in size and complexity, state management using props and emit-ing events tend to fall behind, codebase becomes more harder to mantain and bugs are more likely to happen. That's when a more robust state management pattern helps a lot reducing complexity, preventing bugs and making the codebase easier to mantain.
Vuex is the officially supported Flux implementation for Vue.js Applications. Vuex is a state management pattern + library for Vue.js applications. It serves as a centralized store for all the components in an application, with rules ensuring that the state can only be mutated in a predictable fashion.
# Installation
Vue.js recommends for most Single Page Applications implementing a centralized state store the officially supported vuex library.
# Using CDN
You could use simple script tags in order to load vuex from a CDN link.
Include vue-router after Vue and it will install itself automatically:
<script src="/path/to/vue.js"></script>
<script src="https://unpkg.com/vuex"></script>
# Using Npm / Yarn
npm install vuex --save

//or

yarn add vuex
When used with a module system, you must explicitly install Vuex via Vue.use():
import Vue from 'vue';
import Vuex from 'vuex';

Vue.use(Vuex);
You don't need to do this when using global script tags.
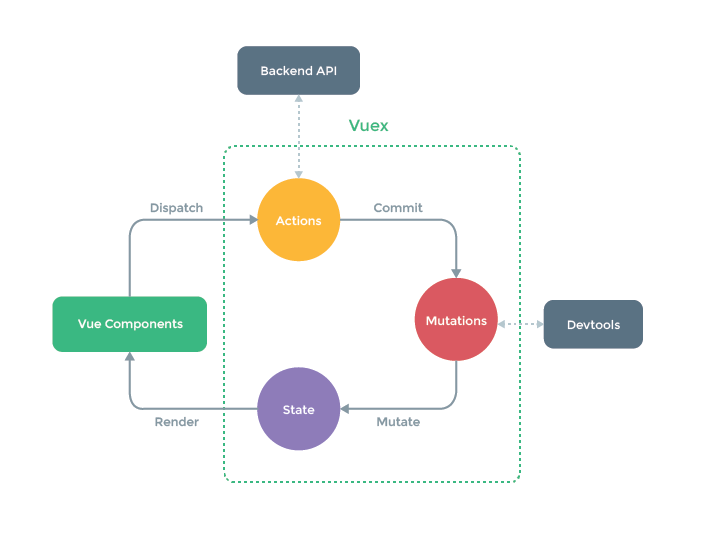
# How Vuex Works
At the center of every Vuex application is the store. A "store" is basically a container that holds your application state. There are two things that make a Vuex store different from a plain global object:
Vuex stores are reactive. When Vue.js components retrieve state from it, they will reactively and efficiently update if the store's state changes.
You cannot directly mutate the store's state. The only way to change a store's state is by explicitly committing mutations. This ensures every state change leaves a track-able record, and enables tooling that helps us better understand our applications.
# The Basics
# State
The State is the application data that components will be reflecting to. State is a single object and it contains all the application state, this will serve as the single source of truth. This is primarily located in the Store.
State is a plain old javascript object that reflects the application state at certain point of time.
// Store instantiation
const store = new Vuex.Store({
  state = {
    count: 0
  };
};
The way to display the State inside the store in our Vue.js components is through computed properties. Taking adventage of the reactivity of Vuex and computed properties whenever store.state.count changes[], it will cause the computed property to re-evaluate, and trigger associated DOM updates.
<template>
	<div>
		<span>{{ counter }}</span>
	</div>
</template>
<script>
export default {
	name: 'SimpleCounter',
	computed: {
		counter() {
			return this.$state.count;
		}
	}
};
</script>
Vuex offers a set of helpers functions in order to decouple components from the store. The mapState helper function generates a computed getter function for us and makes it available in our components.
<template>
	<div>
		<span>{{ counter }}</span>
	</div>
</template>
<script>
import { mapState } from 'vuex';

export default {
	name: 'SimpleCounter',
	computed: mapState(['counter'])

	/** as mapState is an object, using it with
  additional properties will be as follows:

  computed: {
    ...mapState(["counter"]),
    otherComputedProperty() {}
  };
 **/
};
</script>
# Getters
You can think of them as computed properties for the Store. Like computed properties, a getter result is cached based on its dependencies, and will only re-evaluate when some of its dependencies have changed. Easy way to make use of getters in Vue.js components is by leveraging the mapGetters helper function.
Getters are really helpfull when we need derived state from the store like this:
computed: {
  todosCompletedCount() {
    return this.$store.todos.filter.(todo => todo.completed).length;
  }
}
Now imagine if more than one component needs to make use of this, resulting in a bunch of duplicated code.
Vuex allows us to define "getters" in the store. You can think of them as computed properties for stores. Like computed properties, a getter's result is cached based on its dependencies, and will only re-evaluate when some of its dependencies have changed.
Getters will receive the state as their first argument:
// Store instantiation
const store = new Vuex.Store({
	// State
	state: {
		todos: [
			{ id: 1, text: 'Todo One', completed: true },
			{ id: 2, text: 'Todo Two', completed: false }
		]
	},
	// Getters
	getters: {
		completedTodos: state => {
			return state.todos.filter(todo => todo.completed);
		}
	}
});
The mapGetters helper simply maps store getters to local computed properties:
<template>
	<div>
		<span>Completed todo count {{ completedTodos }}</span>
	</div>
</template>
<script>
import { mapGetters } from 'vuex';

export default {
	name: 'SimpleTodoCounter',
	computed: {
		...mapGetters(['completedTodos'])
	}
};
</script>
# Mutations
The only way to actually change state in a Vuex store is by committing a mutation. Vuex mutations are very similar to events: each mutation has a string type and a handler. The handler function is where we perform actual state modifications, it will receive the state as the first argument and any payload as the second argument:
// Store instantiation
const store = new Vuex.Store({
	// State
	state: {
		count: 0
	},
	mutations: {
		increment(state) {
			state.count++;
		},
		// mutation with a payload
		incrementBy(state, payload) {
			state.count += n;
		}
	}
});
This way you can use mutations in components as follows:
<template>
<div>
  <span>{{ counter }}
  <button @:click="increment">Increment</button>
  <button @:click="incrementByTen">Increment by Ten</button>
</div>
</template>

<script>
import { mapState } from 'vuex';

export default {
  name: 'Counter',
  methods: {
    increment() {
      this.$store.commit('increment');
    },
    incrementByTen(){
      this.$store.commit('incrementBy', 10)
    }
  },
  computed: mapState(['counter']) // this returns state.count
}
</script>
There is also a mapMutations helper function that will map the mutations into the components instance
<template>
<div>
  <span>{{ counter }}
  <button @:click="increment">Increment</button>
  <button @:click="incrementBy(10)">Increment by Ten</button>
</div>
</template>

<script>
import { mapState, mapMutations} from 'vuex';

export default {
  name: 'Counter',
  /** maps this.increment and this.incrementBy  to
   * `this.$store.commit('increment')` & √`this.$store.commit('incrementBy', amount)`
   * respectively  **/
  methods: mapMutations(['increment','incrementBy']),
  computed: mapState(['counter']) // this returns state.count
}
</script>
# Actions
Actions are similar to mutation only difference being action commits mutations and actions can contain arbitrary asynchronous operations. Let's register a simple action:
const store = new Vuex.Store({
	state: {
		count: 0
	},
	mutations: {
		increment(state) {
			state.count++;
		}
	},
	actions: {
		increment(context) {
			context.commit('increment');
		},
		incrementBy(context) {
			context.commit('increment');
		}
	}
});
Actions are triggered with the store.dispatch method.
store.dispatch('increment');
This might sound similar to mutations. But here's the deal, Mutations are sycnronous actions don't. This takes a lot of importance when we may need side effects in our application
actions: {
  // ES6 argument destructuring
  incrementAsync ({ commit }) {
    setTimeout(() => {
      commit('increment')
    }, 1000)
  }
}
In a similar fashion Vuex provides a mapActions helper function that will make available all the actions passed as an argument to our component instance.
<template>
<div>
  <span>{{ counter }}
  <button @:click="increment">Increment</button>
</div>
</template>

<script>
import { mapState, mapActions } from 'vuex';

export default {
  name: 'Counter',
  // maps this.increment  `this.$store.dispatch('increment')`
  methods: mapActions(['increment']),
  computed: mapState(['counter']) // this returns state.count
}
</script>
# Modules
Building a large scale application could amount to a large amount of data in the store. Modules comes in as a rescue here serving as a container for all stores. Each module can contain its own state, mutations, actions, getters, and even nested modules - it's fractal all the way down:
const moduleA = {
  state: { ... },
  mutations: { ... },
  actions: { ... },
  getters: { ... }
}

const moduleB = {
  state: { ... },
  mutations: { ... },
  actions: { ... }
}

const store = new Vuex.Store({
  modules: {
    a: moduleA,
    b: moduleB
  }
})

store.state.a // -> `moduleA`'s state
store.state.b // -> `moduleB`'s state
# Example
After installing Vuex, let's create a store. It is pretty straightforward - just provide an initial state object, and some mutations:
// main.js
import Vue from 'vue';
import App from './App.vue';
import Vuex from 'vuex';

Vue.config.productionTip = false;
Vue.use(Vuex);

const store = new Vuex.Store({
	state: {
		count: 0
	},
	mutations: {
		increment: state => state.count++,
		decrement: state => state.count--
	}
});

new Vue({
	store,
	render: h => h(App)
}).$mount('#app');
<!-- App.vue -->
<template>
	<div id="app">
		<h5>The simplest counter</h5>
		<p>{{ count }}</p>
		<p>
			<button @click="increment">+</button>
			<button @click="decrement">-</button>
		</p>
	</div>
</template>

<script>
export default {
	name: 'App',
	computed: {
		count() {
			return this.$store.state.count;
		}
	},
	methods: {
		increment() {
			this.$store.commit('increment');
		},
		decrement() {
			this.$store.commit('decrement');
		}
	}
};
</script>
As you can see, now we are able to access the state object as store.state, and trigger a state change with the store.commit method:
Again, the reason we are committing a mutation instead of changing store.state.count directly, is because we want to explicitly track it. This simple convention makes your intention more explicit, so that you can reason about state changes in your app better when reading the code. In addition, this gives us the opportunity to implement tools that can log every mutation, take state snapshots, or even perform time travel debugging.
Using store state in a component simply involves returning the state within a computed property, because the store state is reactive. Triggering changes simply means committing mutations in component methods.
Here's the complete example:
# Additional Links
# Project Tasks
You might have noticed the emitter pattern to be useful, but also, to be hard to maintain and implement as your application gets complex. Let's implement a Vuex pattern and see how it comes into place:
- Add Vuex store as main state source.
# Resolution
Vuex is definitely a much more simpler approach when you need to communicate information between components, let's take a look at its implementation and benefits:
← Flux Pattern Testing →